Table of Contents
- Vertex Modeling
The Vertex Modeling tab of the modeling panel contains tools for creating and editing polyhedric shapes in a freehand style, by starting off with basic 3D forms (Polygons or 3D Primitives).
Most tools in this section do not support dynamic geometry, no matter what DG mode is chosen.
![]() The edge tool has three associated tools: Extract along, Extract around and
Extract fillet, which work only on the edges of objects. Since these tools are
very similar, being combined into one tool makes it easier to use.
The edge tool has three associated tools: Extract along, Extract around and
Extract fillet, which work only on the edges of objects. Since these tools are
very similar, being combined into one tool makes it easier to use.
A special manipulator appears on the selection, made of three elements, each corresponding to a function of the tool:
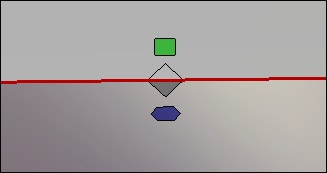
The edge tools special manipulators.
Each of these tools is also available individually in order to assign a keyboard shortcut to them.
Remarks:
Keyboard shortcut: E
![]() The extract around tool lets you create two edges parallel and around
the original edge, or edges, depending on the selection made before. The original
edge stays selected after the operation is finished.
The extract around tool lets you create two edges parallel and around
the original edge, or edges, depending on the selection made before. The original
edge stays selected after the operation is finished.
Usage:
![]() The extract along tool lets you extract a selected edge along the edges next
to it. This tool is useful for fine-tuning a model, for example adding a loop of edges
around an existing edge.
The extract along tool lets you extract a selected edge along the edges next
to it. This tool is useful for fine-tuning a model, for example adding a loop of edges
around an existing edge.
Usage:

From left to right: the edges selection, the extract along operation and the final result.
Keyboard shortcut: Shift+A
![]() The extract fillet tool lets you extract a selected edge along the edges next
to it. The result is like the chamfer tool set to range 0.
The extract fillet tool lets you extract a selected edge along the edges next
to it. The result is like the chamfer tool set to range 0.

From left to right: the edges selection, the fillet operation and the final result.
Usage:
Keyboard shortcut: Ctrl+F
![]() The fast extrude tool lets you extrude faces or edges depending on your
selection.
The fast extrude tool lets you extrude faces or edges depending on your
selection.
The results differ according to the selection. If the selection is faces: a specific manipulator appears, made of three elements, permitting different operations:
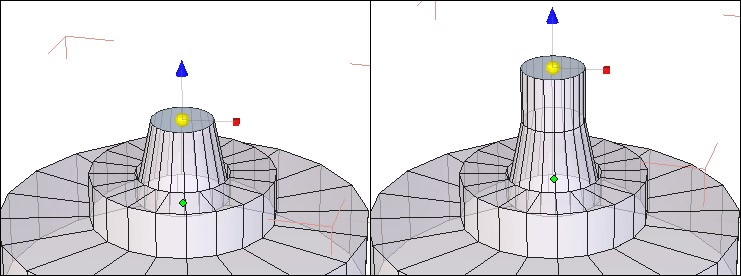
The manipulator on a face selection.
If the selection is made of edges shared by two polygons:
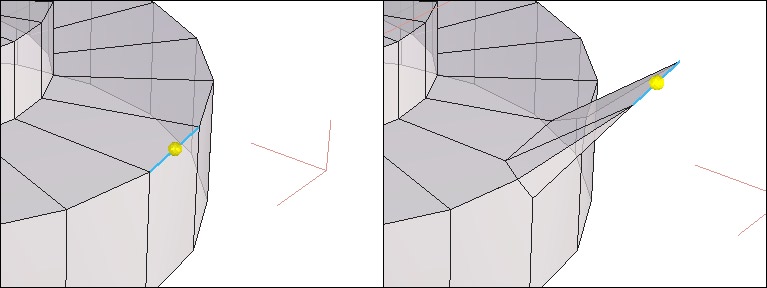
The manipulator on an edge selection.
If the selection is made of edges that are on the border of a face (the edges around a plane for example) the manipulator by default stays the same (move, rotate, scale or universal), but when the edge is moved, a new face is created from the selected edge.
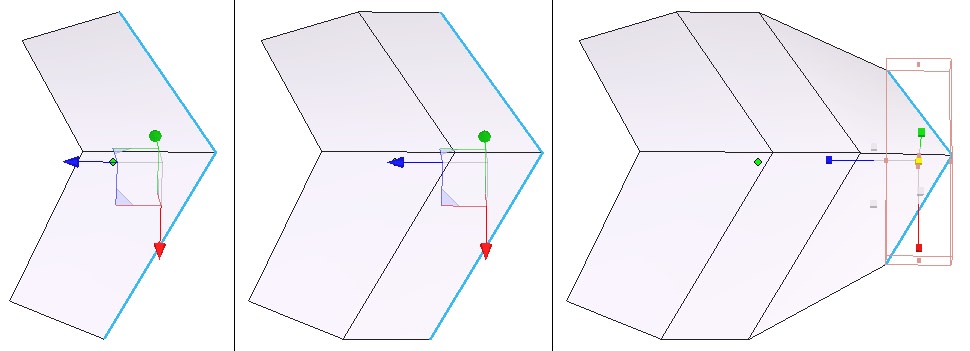
From left to right: an extrusion on edges on a border of a face.
Usage:
Remark:
Keyboard shortcut: Ctrl (different extrusion possibilities exist depending on the selection).
![]() This tool lets you move an edge along its adjacent face. It is a very useful
tool for fine-tuning, for example, moving an “edge loop” on an existing surface,
like around an eye.
This tool lets you move an edge along its adjacent face. It is a very useful
tool for fine-tuning, for example, moving an “edge loop” on an existing surface,
like around an eye.

From left to right: the initial edges, the move along operation and the final result.
Usage:
![]() The symmetry tool lets you make a copy of an object, according to a
mirroring plane chosen either on the bounding box around the original object, or
an offset plane you can define. This tool has a clone option, letting the mirrored
object be a clone.
The symmetry tool lets you make a copy of an object, according to a
mirroring plane chosen either on the bounding box around the original object, or
an offset plane you can define. This tool has a clone option, letting the mirrored
object be a clone.
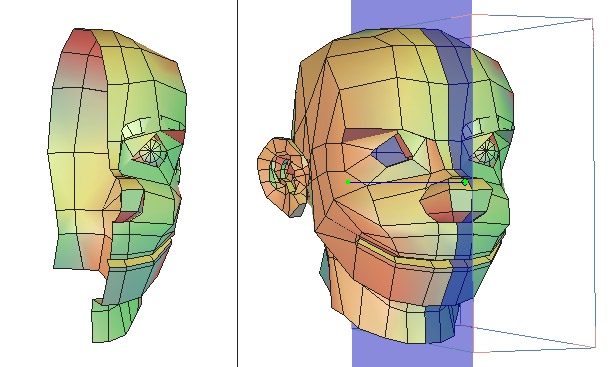
Left: the original object. Right: the mirrored object.
Usage:
Options:
Remark:
Keyboard shortcuts:
![]() The tesselate tool lets you add detail to the topology of an object by cutting
faces or adding edges where desired.
The tesselate tool lets you add detail to the topology of an object by cutting
faces or adding edges where desired.
![]() The free tesselation mode lets you cut a face by adding edges between
clicked points located either on edges or directly on the polygon surface. This tool
is very convenient when creating objects in “Box modeling” because it allows you
to draw new edges directly on a polygon.
The free tesselation mode lets you cut a face by adding edges between
clicked points located either on edges or directly on the polygon surface. This tool
is very convenient when creating objects in “Box modeling” because it allows you
to draw new edges directly on a polygon.

From left to right, the tesselation in action.
Usage:
Remarks:
![]() The tesselation by segment mode (by default) lets you “cut” a face by
adding edges between clicked points on the object.
The tesselation by segment mode (by default) lets you “cut” a face by
adding edges between clicked points on the object.

From left to right, the tesselation in action.
Usage:
![]() This “Tesselation” allows you to add a vertex on an edge of an existing polygon
to transform, for example a triangle into a quadrangle.
This “Tesselation” allows you to add a vertex on an edge of an existing polygon
to transform, for example a triangle into a quadrangle.
Usage:
Remark:
![]() The tesselation by slice mode will slice the object perpendicular to the edge
at the place clicked on that edge. If the topology permits, the slice will go around
the object.
The tesselation by slice mode will slice the object perpendicular to the edge
at the place clicked on that edge. If the topology permits, the slice will go around
the object.

From left to right: the original object and the starting edge, the slice and the slice once selected.
Usage:
Remark:
![]()
![]()
![]() The three “automatic tesselation” tools enable you to subdivide the selected
faces into respectively a rectangle, a triangle or a rhombus.
The three “automatic tesselation” tools enable you to subdivide the selected
faces into respectively a rectangle, a triangle or a rhombus.
These tools allow you to locally refine the geometry to work on it with more accuracy.

On the left, selected polygons. On the right, the same polygons with an automatic tesselation applied.
Usage:
![]() The connect tool creates edges according to a selection made before, either
vertices or edges (but not faces).
The connect tool creates edges according to a selection made before, either
vertices or edges (but not faces).
In the case of a selection of edges parallel to each other (like a “ring” selection), the tesselation is made perpendicular to and at the middle of each edge.
In the case of two points on the same polygon, the tesselation is made between these two points.
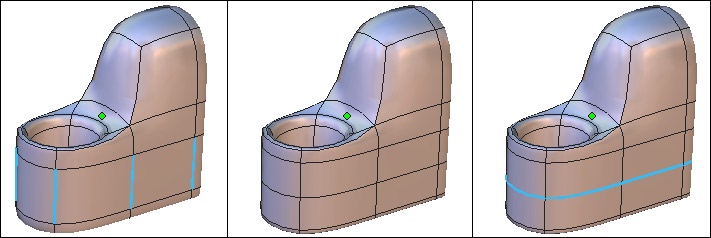
From left to right: selected edges, the tesselation and the resulting selection.
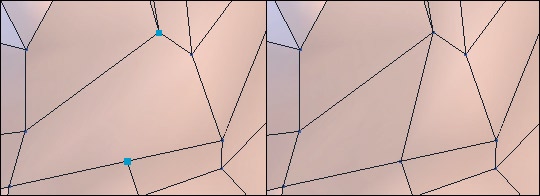
Left: selected points. Right: the final tesselation.
Usage:
Remark:
![]()
![]() The smooth more/less tools lets you define the quality of the object, whether
they are lines or polygon objects.
The smooth more/less tools lets you define the quality of the object, whether
they are lines or polygon objects.
These tools are like the smoothing tool in the surface modeling tab, except only the default smoothing of Catmull-Clark/surface subdivision is applied, with no options of other types offered.
The tool lets you rapidly go from “high to low” resolution and back again, preferably while using the keyboard shortcuts.
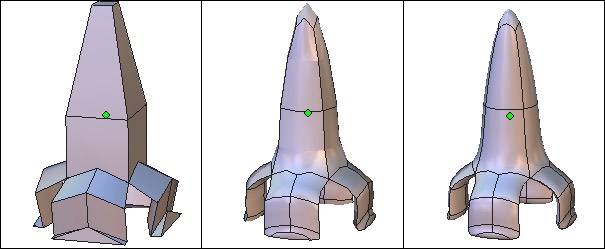
From left to right: The object with no smoothing, then, a range 1 smoothing and, the range 2 smoothing.
Usage:
Remarks:
Keyboard shortcuts:
![]() The close tool will close openings on the selected object.
The close tool will close openings on the selected object.
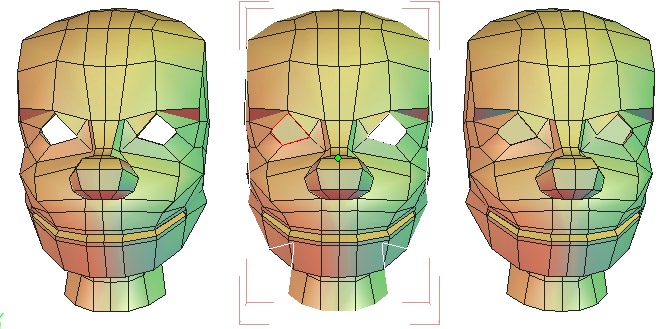
From left to right: the objects with its openings, the object being closed and the final.
Usage:
Options:
Remark:
![]() The weld objects tool lets you join several objects together permanently, in
order to have one object. Not to be confused with the group tool which is only a
temporary association of objects. This tool is also located in the Surface Modeling
tab.
The weld objects tool lets you join several objects together permanently, in
order to have one object. Not to be confused with the group tool which is only a
temporary association of objects. This tool is also located in the Surface Modeling
tab.
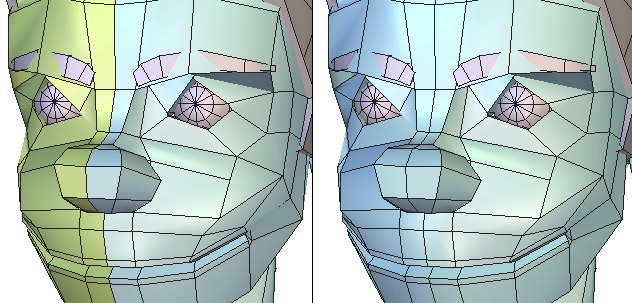
Left: the two independent objects. Right: the two objects welded together.
Usage:
Options:
Remarks:
![]() The weld points tool lets you weld selected points.
The weld points tool lets you weld selected points.
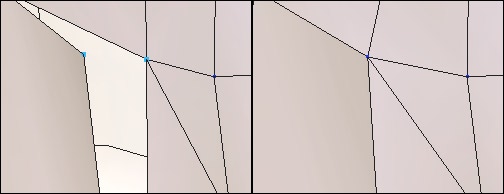
Left: the surfaces with unwelded points. Right: the merged points.
Usage:
Remarks:
![]() The average weld tool lets you define a zone of influence, or distance, on a
selection of points. If within the selection there are points within the distance, they
will be welded together.
The average weld tool lets you define a zone of influence, or distance, on a
selection of points. If within the selection there are points within the distance, they
will be welded together.
This tool is very useful after a symmetry operation, where you want to weld the two parts together. In many cases, the points around a symmetry plane are not aligned, and it is necessary to weld them one at a time. With this tool, you only need to select the whole area of the plane of symmetry and to input a low value for the zone of influence, so that only the very close points are welded.
Usage:
![]() The target weld tool lets you weld a vertex or edge to another of the same
type.
The target weld tool lets you weld a vertex or edge to another of the same
type.

From left to right: the edge to be welded. The target selection and the final result.
Usage:
Remarks:
Keyboard shortcut: W
![]()
![]() The sweep surface and extrude surface tools, in the vertex modeling tab,
let you sweep (or tube) and extrude faces, edges and vertices, either previously
selected, or once the tool is active.
The sweep surface and extrude surface tools, in the vertex modeling tab,
let you sweep (or tube) and extrude faces, edges and vertices, either previously
selected, or once the tool is active.
These tools let you easily make complex shapes, starting from simple ones. The tools function the same way, only the results change depending on the options used. They are used with the technique often called “box modeling”.
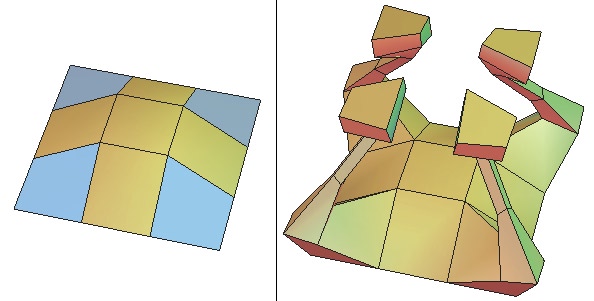
Left: the original object with selected polygons. Right: the result of the sweep.
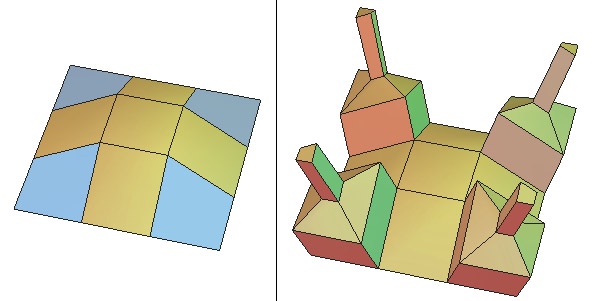
Left: the original object with selected polygons. Right: the result of the extrusion.
Usage:
Options:

Left: the original object with selected polygons. At the center, the result of the block on option. Right: the result of the block off option.
![]() The tweak tool can quickly modify geometry of an object by moving its
structure. The goal of this tool is to visually refine the aspect of an object, like a
sculptor refines his sculpture.
The tweak tool can quickly modify geometry of an object by moving its
structure. The goal of this tool is to visually refine the aspect of an object, like a
sculptor refines his sculpture.
This tool always moves its entities according to the camera plane (parallel to the screen).
Usage:
Remark:
![]() The extract tool lets you separate a selection of faces from an object, to
obtain a new object from the selected one.
The extract tool lets you separate a selection of faces from an object, to
obtain a new object from the selected one.

From left to right: the selected polygons, the extracted faces and the extracted faces moved.
Usage:
Remark:
![]() The “Bridge” tool builds a connecting surface between two selections. This
tool is very useful to create surfaces joining two existing parts of an object, for
example to connect the extremity of the handle of a vase onto its base.
The “Bridge” tool builds a connecting surface between two selections. This
tool is very useful to create surfaces joining two existing parts of an object, for
example to connect the extremity of the handle of a vase onto its base.
If faces are selected, they will be removed and a surface will be created between the two holes. If the object is smoothed, the bridge operation is performed on the control shape and the result is automatically smoothed. If both selections belong to different objects, the bridge is created and both objects are automatically welded together into a single object.
Usage:
Options:
Remarks:
![]() The “Dissociate” tool disjoins the object structure around an edge, a vertex
or a face. This splits, for example, two faces that share an edge and allows you to
“open” a geometry, such as to insert an eye in a face, and so on.
The “Dissociate” tool disjoins the object structure around an edge, a vertex
or a face. This splits, for example, two faces that share an edge and allows you to
“open” a geometry, such as to insert an eye in a face, and so on.
Usage:
Remarks: