User Tools

Site Tools


Creating and Managing UVs

Introduction

Hexagon lets you apply some basic attributes of textures to your model (color, highlight, transparency, etc.), and also applies what are called UV coordinates, or how a texture or image will be projected along the surface of the object.

These UV coordinates are saved with the geometry of your objects when you export in a standard exchange file format, such as .CAR and .OBJ, to take it into a render and animation program such as Carrara.

Texture Mapping

Texture mapping is an operation which determines how a texture is projected onto an object, and is only useful if the material to be used is a checker or image texture map (texture mapping does not make sense with a uniform color).

This operation will apply UV coordinates (a 2D point on the image) to each 3D point on the object.

For this, you will use UV mappinG Gizmos which are special manipulators letting you place, orient, scale and position the UVs on the object.

Using the Gizmos

The UV & Paint tab in the tools panel contains seven tools:

  • The spherical gizmo
  • The cylindrical gizmo
  • The planar gizmo
  • The cubic gizmo
  • The gizmo editor
  • The UV unfold tool
  • The UV stretch manipulator

Each gizmo corresponds to the same tool, but with a different starting shape: spherical, cylindrical, planar or cubic.

You will project the texture map onto the object as if it was wrapped on the geometry of the object.

Usage:

  • Select the gizmo of which the shape matches closest the shape of your object.
  • A manipulator appears around the object, and the image is projected on the object following the shape chosen.
  • The gizmo manipulator functions like the universal manipulator.
  • In the tool properties palette, you have access to:
    • A scrolling menu of gizmos already used, in order to reuse its basic characteristics.
    • A new button , allowing you to create a new gizmo, either based on the gizmo chosen from the list, or one of the default gizmos.
    • Three axis buttons for placing the gizmo's orientation to the X , Y or Z (Except for the cubic gizmo, which has its own UV mapping: one UV space for the whole cube, one UV space for each pair of opposite faces of the cube, and one UV space per face of the cube.)
    • Use these to reinitialize the gizmo to the correct plane.
    • Buttons Invert U / Invert V and Exchange UV, which allow you to flip the image.
  • Use these tools and options to globally place your texture on the object.
  • Use also the 3D manipulator to place, orient and dimension your texture directly in the 3D Workspace.
  • Validate the tool when the texture is correctly placed.


The Gizmo Editor

This tool lets you edit a gizmo which has been already applied on an object. It also allows you to change the projection type.

If no gizmo has been applied to the object, the gizmo editor will create a default one (spherical projection).

The editor also displays the list of all existing gizmos, allowing you to apply the Gizmo of one object to another one. This enables applying the same projection to a set of objects. Furthermore, modifying one of the gizmos will update it on all the objects on which it is applied.

The Gizmo UV Stretch

Usage:

  • Select an object where the UV textures have already been applied.
  • Select the entities (points, edges, faces) of which you want to locally modify the UVs.
  • Select the tool UV Stretch.
  • A specific manipulator appears next to your selection, which lets you move, rotate, or scale in the same way as the universal manipulator, modifying the UV values of the selection.
  • Validate the tool to fix the updated UV coordinates.

Remark:

  • The gizmo affects the shading domain if there is one selected. Select one before using this tool if you want to affect a specific domain.


The UV Editor

The UVs are the projection of 2D information onto a 3D mesh. It is pretty convenient and useful to be able to visualize and work on them in an abstract 2D view. Hexagon delivers a specific UV editor which displays the UV information, and lets you work on UVs using specifically appropriate tools, manipulators and options.

Interface

The UV editor is composed of several parts:
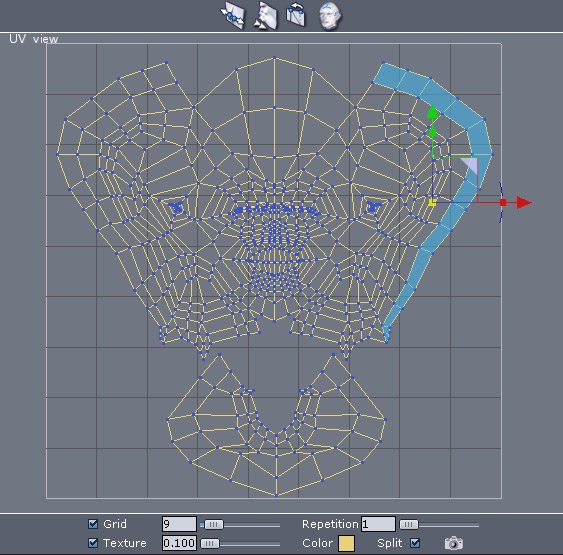
  • At the center, the workspace where UVs of the selected object will be displayed.
  • A square representing the UV space. The texture of the model will be displayed here. It is possible to modify the display in order to use texture repetitions and to increase the workspace.
  • A tool bar is displayed on the top of the window, containing the tools that will allow you to work on UVs.
  • A preferences and utilities bar is displayed at the bottom of the window.

uv_editor_interface.jpg
The UV editor interface.

This working environment is slightly different from the 3D Views, especially since we are working here with a 2D View (like in a drawing or image editing software). Even if the displayed UV mesh may look like an orthogonal 3D view, it is of course impossible to “turn around” the model.

The navigation works in a similar way as in the 3D orthogonal views. It means that it is possible to make pans and zooms, using the mouse, the keyboard or dedicated navigation icons.

Remark:

  • On low resolution screens (1024×768), it may happen that the default layout which splits the screen into two vertical columns could mask a part of the preferences and utilities toolbar located at the bottom of the window. On such configurations, for a better comfort, choose the layout which splits the screen into two horizontal rows, or a full-screen display of the UV view.

Selection and Manipulators

The selection within the UV space is similar to that within the 3D space, and the selection modes operate the same way. Turn to face selection mode for example, by clicking on the appropriate icon in the selection palette, and you will be able to select your UVs by “faces”. This is the same with the vertex, Edge and auto selection Modes.

Furthermore, selecting an item in the 3D View will select the corresponding UVs in the UV editor, and conversely. This way, it will be sometimes easier to perform selections in the UV view, and sometimes in the 3D View.

Once you have selected the desired elements, you can use the 3D Manipulators to edit your UVs, either to translate, rotate, scale your elements, or using the universal manipulator. The only difference is that they will work in two dimensions only.

Remark:

  • The loop, ring and select between selection utilities operate in the UV view. It is possible to perform a selection in the 3D View and then, to further edit selected UVs in the UV editor.

Tools For Working With UVs

Although UVs are in two dimensions, operations which can be performed on them are very close to operations on 3D meshes. To make learning and use easier, the tools in the UV editor are the same as the corresponding 3D tools. The way they work is absolutely similar, except they only handle 2D data.

These tools are:

  • Dissociate: disjoin UVs according to the selection mode (Vertex, Edge, Face). If the option “Split UV” is on, blue dots will be displayed around disjoined UVs allowing you to select overlapping points.
  • Relax: expands the UV map by slackening them smoothly.
  • Target Weld: welds a selected UV on another. This tool works on vertices and edges, as the 3D tool.
  • Unfold: Unwraps the UV map of a model. For a more detailed description, please read the following information.


Options and Utilities

To make easier to view and work with UVs, the UV editor offers some specific preferences and utilities:

uv_options_and_utilities.jpg
UV options and utilities.

  • Grid: masks or unmasks the background grid in the UV editor, and lets you adjust the grid density. When the value is 0, the grid disappears, but the grid contour stays visible.
  • Texture: masks or unmasks the texture applied to the edited object, and lets you adjust the opacity of the displayed texture, from 0.1 (almost invisible) up to 100 (opaque).
  • Color: allows you to choose the display color of the UV mesh.
  • Repeat: Lets you choose the level of repetition of the texture around the grid.
  • Split: Displays disjoined UVs. This enables to display dots at the corner of disjoined UVs when they overlap. Click on a dot places the manipulator on the right UV.
  • Export UVs texture: exports, as an image, the UVs representation which strictly fits into the UV square limits. Note: the exported texture is based on the screen resolution. Do not hesitate to display the UV window in full screen. Once you have clicked on the Export button, a system dialog box will appear for you to specify the name, the format and the location of the image you want to save.

Unfold

The unfold tool is a very convenient tool which allows you to unfold the UV map of any model, even the most complex ones. To do so, we will have to define virtual openings, like the zippers of a coat, called “Seams” and if necessary, “Pinpoints”, which are points to which the unfolded template will be stitched.

Such terms related to needlework are commonly used for this tool, as the operation it performs is in fact the opposite work a tailor does: creating a UV template from a finished 3D shape.

Principles

To use this tool, the major thing to define is the seam(s) on the mesh. A Seam is a selection of contiguous edges on the 3D model from which the UV mesh will be unwrapped.

These seams must be defined in specific areas. They must be created in order to get the optimal unfolded model, avoiding UVs distortions which are too obvious.

Additionally, Pinpoints will help the tool to make a uniform and well proportioned unfolding, according to the fact that this unfolding will be performed “around” these pinpoints.
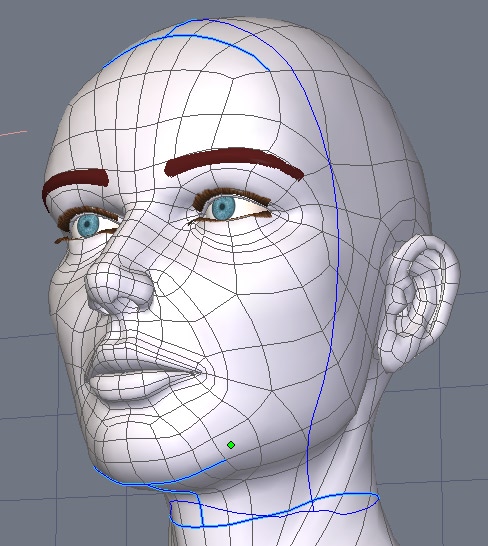
seam_example.jpg
A set of seams on a face.

Unfolding UVs

Usage:

  • Before starting to use the unwrap tool, select the edges which will define the seam lines. Selection can be done entirely, or updated within the unwrap tool.
  • Select the unwrap tool, located in the “UV & Paint” tab: if edges are already selected, they will be converted into seams, and will be displayed in dark blue color.
  • In the properties panel, choose in the “Define” pull-down menu the type of elements to add: seams or pinpoints.
    • In the first case, the selection mode will turn to edge mode, allowing you to complete the selection which has been previously done. Alternatively, create your seams selection now.
    • In the second case, the vertex selection mode is activated, letting you add pinpoints. The selection works in auto-reverse mode: a click will select a point, a click on a selected point will deselect it.
  • In the properties panel, click on “+” or “-” icons to add or remove the current selection to seams or to pinpoints. However, it is not possible to add at the same time a selection both to seams and to pinpoints. The two operations must be performed individually.
  • Define the margin between each UV group by adjusting the margin value. The weaker the margin value, the closer the UV groups are to each other.
  • Define the projection axis of the unwrap tool: Hexagon uses a planar projection to perform the unfolding operation. Generally, the best axis is the one perpendicular to the planar projection.
  • Define the orientation of the pinpoints axis, in U or V, which lets you perform a 90° rotation when unfolding.
  • Once all the parameters have been set, click on the unwrap icon, located left to the “+” and “-”, to get a preview of the unfolding in the UV view.
  • Do the previous steps again if necessary before validating the tool.
  • Validate to release the tool.

Remark:

  • For better results, try as much as possible to close the open parts of the model, such as for example eyes and mouth for a face.


Re-Editing the Unfolding

Once you have used the unwrap tool, it is still possible to re-edit the unfolding in different ways: add or remove seams and pinpoints, as well as move the existing pinpoints in the 2D view, to uniformly deform the UV map.

Usage:

  • Select an object having previously been unfolded through the unwrap tool.
  • Choose the unwrap tool.
  • Add, update or remove seams and pinpoints, as described in the unwrap tool description above.
  • Click on a pinpoint in the UV view to make the manipulator appear on it. Move pinpoints to recompute the entire UV unfolding in real time. It is also possible to do a pinpoints multi-selection, to move, scale or rotate pinpoints at the same time.
  • Validate to release the tool.

Remarks:

  • Seams and pinpoints are not saved with the 3D document. It is as such not possible to re-edit seams and pinpoints when the document has been saved, closed and reloaded.
  • Pinpoints can be manipulated only in the unwrap tool. Once the tool is done, these points are not accessible in the UV View.