Table of Contents
DAZ Studio 4.x
- QuickStart Guide PDF
- User Guide PDF
* = Review
Check Report 0042608: Editing weight map messes up maps of other bones
Use this tool to paint Weight Maps using the TriAx(tm) system, to define which geometry will be affected by specific bones, and to what extent. Note that weight maps are per-axis in this system, and are specified separately per axis for Rotation, Bulge Left and Bulge Right, Scale, etc., though it is often reasonable to use the same map as a starting point for each within the same bone.
The Transfer Utility... creates default weight maps in conforming items for bones in the Genesis™ figure. However, these maps can be edited, and new maps will need to be created for additional ghost bones not associated with the Genesis figure.
Three utilities are used during the process of creating and rigging figures: the Joint Editor, Polygon Group Editor, and Weight Map Brush. The Joint Editor and Polygon Group Editor steps can be performed in either order, and in fact it may be helpful to switch between the two tools frequently. This tutorial covers the Weight Map Brush portion of the process. The bones must be created or edited using the Joint Editor before Weight Maps can be assigned to them. You may also find it helpful to edit Face Groups before working with Weight Maps.
The TriAx rigging system operates differently than the traditional Poser rigging system, though it has some similarities. Like the Poser system, a skeleton of bones is created to match the skeleton of a figure to which the item will be conformed to, or to provide additional controls for unique parts of the figure. Face Groups are created using the Polygon Group Editor which are comparable to Poser's groups. However, Face Groups only allow the end-user to select and manipulate the bones of the skeleton. They do not tie the bones to specific portions of the mesh. Instead, a set of Weight Maps, one for each axis of rotation per bone, describes the influence of each bone on the entire mesh.
The total weight of all maps for a particular axis for any given part of the mesh must be 100%. This means that if you add weight to one map, it will automatically be subtracted from other maps for the same axis. Keep this in mind when following the steps below.
If you have not already done so, convert the mesh to a TriAx figure, by importing the source OBJ, using the Transfer Utility..., using reverse deformations if necessary.
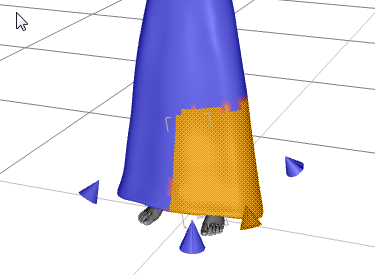
Weight maps will be created during this process, but because in this example we want to use custom “Ghost Bones” to control skirt movement, the maps will not be appropriate in the skirt area:

The results with these weight maps do not provide the functionality we are looking for. We want the new “Ghost Bones” to move the lower part of the skirt, while the thigh bones still move the upper part of the skirt.
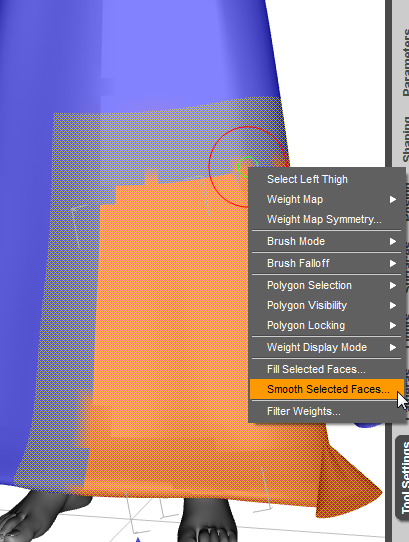
To modify the rigging, we will need to use several tools, including the Joint Editor, the Weight Map Brush, and the polygon_group_editor. For all of these, we will want to be sure to have the Tool Settings tab in view, shown here with the Weight Map Brush details.

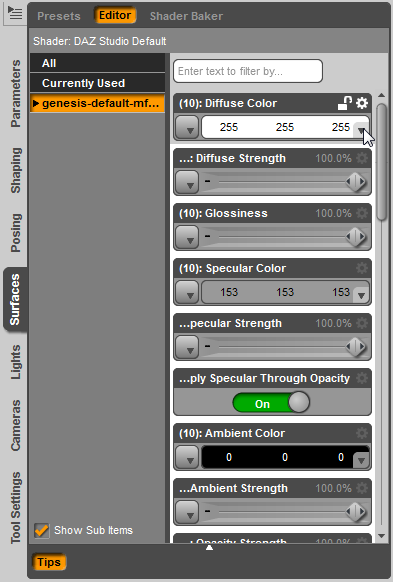
Also, at this point, clear all diffuse color settings in the Surfaces (WIP) tab, to avoid distorting the Weight Maps view:
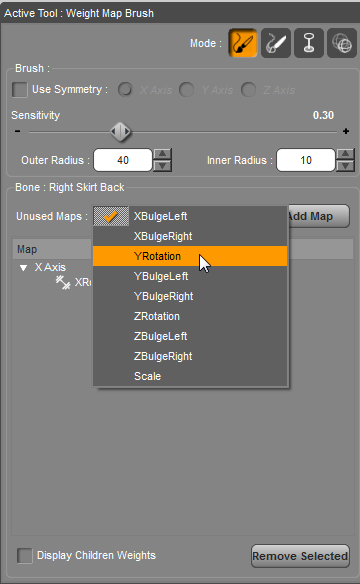
Some bones will already have weight maps (those copied from the source skeleton). Select new bones one by one in scene, and in Tool Settings, add X, Y, and Z rotation and Scale for each bone as needed. (Your garment may look odd until you create the first Scale weight map.)
When you click on bones you don't want to use to control the mesh, in this case, the Left Shin, you will probably see residual weight maps from the Transfer Tool. Don't worry about these at this point. By adding weight to other maps, you will remove weight from this map.
DAZ Studio 4 provides several tools to paint and smooth weight maps:
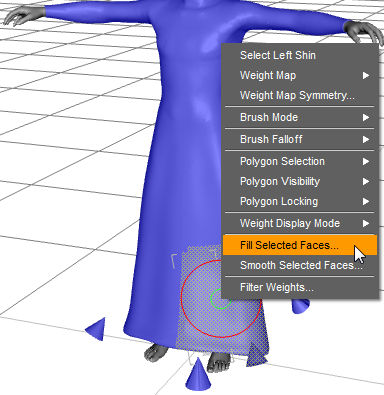
There is also a method of filling selected faces, located in the context menu for the Weight Map Brush. This method works particularly well when we have defined Face Groups to match the areas that will be most heavily influenced by the weight map.
Go back to Polygon Group Editor and select the Face Groups you defined there, one by one.
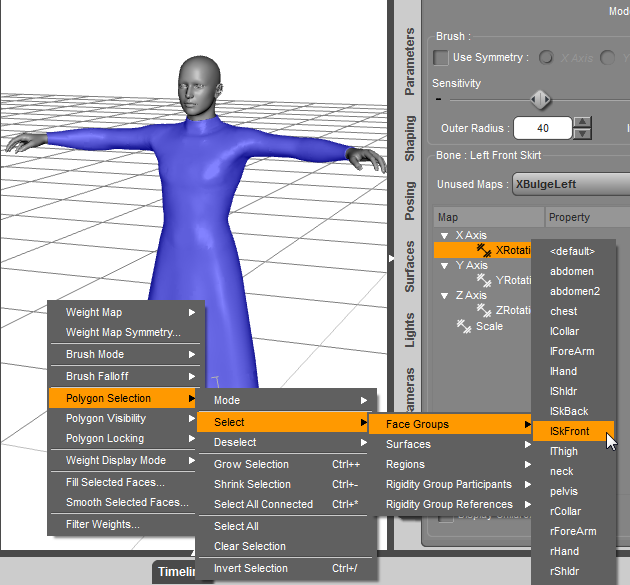
On the first weight map for this bone (usually XRotation), fill selection with 100%.

This gives a sharp-edged weight map:
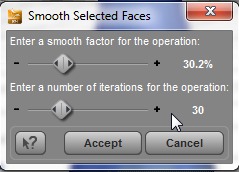
We will get a smoother effect if we soften the edges. Expand selection with Ctrl++, e.g. 4 steps, and smooth selection.
You can be fairly aggressive with this smoothing operation:
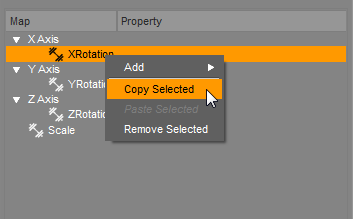
Then copy and paste this map to all other maps for that bone.
40.5 weight_map_brush
You can fine-tune these maps later to improve the different rotational behavior.
Don't forget to clear your selection before moving on to the next bone!
![]()
This process has associated “Ghost” bones with Weight Maps to allow more flexible control of the dress movement. You may continue to edit the skeleton and Face Groups, but you will need to revise Weight Maps if you add or delete bones from the skeleton that have Weight Maps assigned to them.
