Table of Contents
DAZ Studio 4.x
- QuickStart Guide PDF
- User Guide PDF
* = Review
Close-fitting clothing can be fitted to a figure using the Transfer Utility, which supplies bones, Face Groups, Region Groups, weight maps, and morphs. But for loose-fitting items, or items with extra movable parts, or articulated props, the rigging will need to be created manually.
Three utilities are used during the process of creating and rigging “Ghost Bones”: the Joint Editor, Polygon Group Editor, and Weight Map Brush. The Joint Editor and Polygon Group Editor steps can be performed in either order, and in fact it may be helpful to switch between the two tools frequently. This tutorial covers the Polygon Group Editor portion of the process.
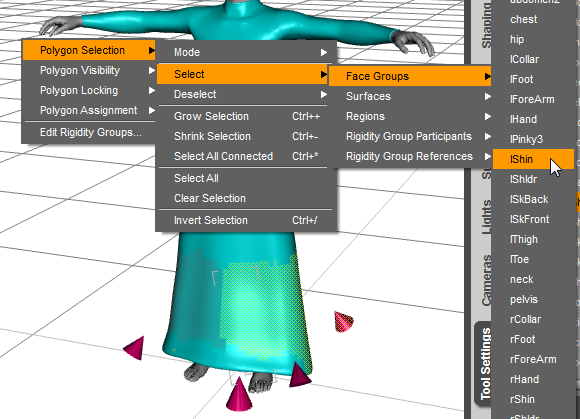
The TriAx™ rigging system operates differently than the traditional Poser rigging system, though it has some similarities. Like the Poser system, a skeleton of bones is created to match the skeleton of a figure to which the item will be conformed to, or to provide additional controls for unique parts of the figure. Face Groups are created using the Polygon Group Editor which are comparable to Poser's groups. However, Face Groups only allow the end-user to select and manipulate the bones of the skeleton. They do not tie the bones to specific portions of the mesh. Instead, a set of Weight Maps, one for each axis of rotation per bone, describes the influence of each bone on the entire mesh.
When we use the Transfer Utility to rig a model, Face Groups from the source figure are transferred to the model. This is not, however, always what we want. For example, in this model, large areas of the skirt have been assigned to the Shin groups, and smaller fragments are assigned to the Foot and Toe groups, which don't even exist in this skeleton:
Because we will be using new “Ghost” bones to control the lower skirt, we will need to create coordinating Face Groups for the Bones.
To modify the rigging, we will need to use several tools, including the Joint Editor, the Weight Map Brush, and the Polygon Group Editor. For all of these, we will want to be sure to have the Tool Settings tab in view, shown here with the Polygon Group Editor details.

Here we can see that there are many polygons assigned to Face Groups like the Right Foot. While assignment of facets to a given Face Group does not tie the facets directly to the bone as it would in traditional Poser rigging, adjusting these groups will make it easier to select the desired polygons during the Weight Map painting phase.
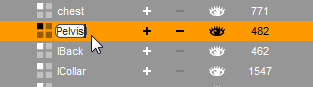
The Genesis figure provides a separate Pelvis bone that can be positioned without moving the entire figure, unlike the Hip of previous generation figures. Rather than leave mesh assigned to the hip, we can reassign it to the pelvis by simply renaming that face group. We will create the connection between the Pelvis bone and this face group later.
The Pelvis weight map will control the connection between the skirt and the upper body. Assigning the bottom center handle to this Face Group will allow the Pelvis to be selected by clicking on this handle. We will also include this handle in the Pelvis weight map so it will move when the bone is adjusted.

Make one Face Group for each surface area that will need to be able to be moved. This will let user see the bones that will be attached to the weight maps, and will make selection of polygons easier in the remaining steps.
Begin by hiding the areas that will not need editing. In this case, we won't be modifying the areas above the hips. We switch to the Front View, and choose the Rectangle selection mode:

Then we select the upper half of the dress, and hide it:

We can see which faces are currently in groups by clicking in the Tool Settings window:

and we can hide the remaining faces we don't want to edit by selecting Face Groups and hiding them.

We can also hide face groups directly in the Polygon Group Editor Tool Settings window:

Eventually, we are displaying only those faces we plan to assign to new Polygon Groups.

There are a number of ways to rig a skirt. For this example, we'll allow the upper half of the skirt to move with the thighs. We'll retain the shin bones, but use them only to control four “ghost bones” at Front Right, Front Left, Back Right, and Back Left. In each case, we'll include a “handle” in the Face Group. This will allow easy selection of that portion of the skirt for movement. We'll attach the Pelvis bone to the bottom handle to allow easy repositioning of the whole skirt where it attaches to the upper body.
With only the faces remaining that will be assigned to the four groups described above, we can quickly cut into four sections using the Rectangle selection mode:

Use the fixed Front View, etc. to be sure of a straight edge in your selections. You can also turn on Use Symmetry for tricky polygon selections that need to be centered. Use of the Wire Shaded view can also help line up selections.
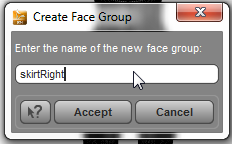
Create a new face group from the selected half of the lower skirt:

This will be a temporary group. Hide the selected surfaces to get them out of the way.
Now, using Left View, choose an appropriate selection point to divide the front of the dress from the back, e.g. the edge of the heel. Be sure to include the appropriate skirt handle in the selection.

Don't forget to clear the selection between operations. Otherwise your previous selection may be reassigned to the Face Group you are currently creating.
Assign the selected area to lFront. Hide the selected faces. The remaining visible faces will be assigned to the new group lBack.

Now split the lower right side of the skirt. Since we made a separate Face Group for this portion of the skirt earlier, we can easily make it visible now:

Finally, repeat the procedure used to split the left half of the skirt, front and back.
You will notice that there are now many empty Face Groups (i.e. with no facets). These can be removed at this point.
![]()
Look for groups that should be empty. For example, we don't plan to have the right foot or left toe controling any facets. Any remaining facets of this sort should be selected and moved to the appropriate Face Group. It may be easiest to do this with the whole garment visible.
If there are facets you won't use at all, e.g. extra handles from a previous rigging system, delete those Face Groups now. The facets will be assigned to the <default> group and you can hide them with a morph, later.
This process has defined Face Groups to coordinate with the new skeletal structure we will use with this dress. These Face Groups will need to be associated with the bones of the skeleton using Weight Maps. If you have not yet edited the skeleton to match the new Face Groups, go to that tutorial next. Otherwise, you can proceed to using the Weight Map Brush.
