User Tools
Site Tools
Sidebar
Second Life Sculpty Props
Hexagon provides sculpty primitives for modeling objects that can be exported in TGA format then imported into Second Life (SL) and applied to a sculpted primitive in SL.
The following sections provide information on creating, exporting, and using sculpties in Hexagon.
Using the Sculpty Primitives
The following steps are used to create, modify, and export scultpies in Hexagon, as well as importing and applying the maps into Second Life.
- Create an SL Primitive and click on Validate.
- Modify the sculpty as needed using the tools listed as safe to use in Hexagon Tool Use on Sculpties.
- Save the scene file as a .HXN file.
- Texture the sculpty.
- Texture the sculpty (hints only).
- Apply the sculpty map to a sculpted prim in Second Life.
Creating Second Life Primitives
To create a Second Life primitive (sculpty) from the tool palette:
- In Hexagon, click on the Second Life tab.
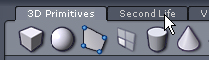
This will display the Second Life primitives tools.

- Click on the primitive tool icon you want to use.
- Create the primitive in the viewport just like you would a regular 3D primitive.
To create a Second Life primitive (sculpty) from the menu:
- Choose Tools > Second Life > primitive from the menu.
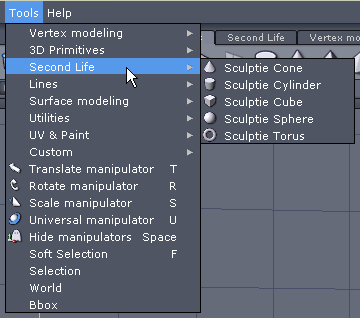
- Create the primitive in the viewport just like you would a regular 3D primitive.
Importing Sculpty Maps
If you have previously exported out a sculpty TGA file or have one from some other source, they can be imported into Hexagon and worked on. One caveat is that some older sculpty files (like those available on the Second Life web site), may come in too “crumpled” to work with.
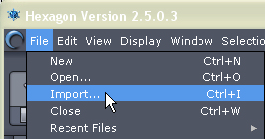
To import a TGA file into Hexagon:
- Choose File > Import from the menu.
- Change the file type to Second Life Sculptie (*.tga).
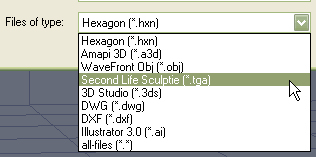
- Locate and select the TGA file and click on Open. The object will be imported into Hexagon.

Hexagon Tool Use on Sculpties
By default, the SL Sculpties in Hexagon are already mapped and you should not need to remap the primitives. It is not recommended that you remap the sculpties but if you absolutely insist on doing so, remap the sculpties following the guidelines in Remapping SL Primitives but do so before you make any modifications to the primitive.
Tools that can be safely used
The following Hexagon tools can safely be used to modify sculpties:
- All manipulators: Translate, Rotate, Scale, and Universal
- All selection tools: Object, Faces, Edges, Points, and Auto Select
- Displacement
- Inflate
- Orient - Does not break SL primitive by itself, but unknown what other tools used with this might break it
- Pinch
- Quad Tessalation - Lessens edge smoothing on map and may provide better results in SL
- Stretch
- Soften
- Brush
- Export Bump
- Increase Smoothing
- Paint
- Smooth
- Taper - All types: Taper Deformer, Bender Deformer, Twister Deformer, and Deformer but may flip the UV Map requiring that the TGA file be flipped horizontally in a paint program. Do not re-UV map after using any tool.
Projection tools that can be used
The following mapping projections can be used on the sculpties prior to modifying them.
- Spherical - Cube (on Y-axis), Sphere, Cylinder, Cone
- Cylindrical - Torus
Tools that can be used with caution
The following tools may break the sculpty when using, but judicious use may fix problems with the mapping. Save a backup of the file before using. Results will vary and are up to the user's skill.
- UV Stretch
- Projection Editor
- Unfold
Tools that cannot be used on sculpties
The following Hexagon tool(s) should not be used to modify sculpties as using them will “break” the sculpty.
- Bend - Breaks the SL primitive and even if UV Mapped before using, will still not perform as expected. Interesting results can be made but it is not generally recommended.
Remapping SL Primitives
The Second Life Primitives are mapped correctly by default so should not require any remapping. But if you must remap (and be very sure of this before doing so), use the mapping methods detailed below. Do not remap after you have used any tools that moved points, edges, or vertices.
To remap sculpties in Hexagon:
- Click on the UV Map & Paint tab.
- Click on the appropriate mapping projection depending on the primitive type:
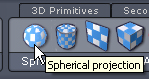
- Cube: Spherical Projection on Y-axis
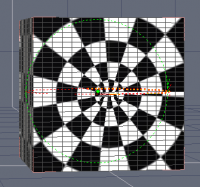
- Click on the Spherical Projection tool.
The cube will look like the image below.
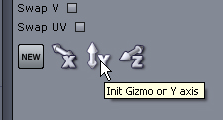
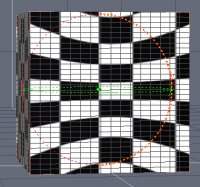
- In the Properties panel, click on the Init Gizmo on Y axis tool.
The cube will look like the image below.
- Click on the Validate button.
- Sphere, Cylinder, & Cone: Spherical Projection
- Click on the Spherical Projection tool.
The primitives will look like the images below.


- Click on the Validate button.
- Torus: Cylindrical Projection
- Click on the Cylindrical Projection tool.
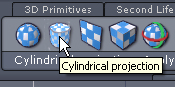
The torus will look like the image below.

- Click on the Validate button.
CAUTION! Once you've used a tool on the primitive, do not remap it!
Using Default Hexagon Primitives
The default Hexagon primitives have no mapping applied to them by default and so will not export as TGA files until they are mapped.
While the default Hexagon primitives can be mapped and exported as sculpty maps, their use is not recommended as there may be issues with reversed normals, crumpling, and the mapping will have to be fixed in Hexagon before exporting or in another mapping program to close up any holes in the mapping or move vertices/edges that are off the map area.
Once you use a mapping method (as detailed in Remapping SL Primitives) on one of the default Hexagon primitives, change to UV View and make sure that no polygons, vertices, or edges are off the edges of the map and that there are no “holes” in the map, i.e., the map must be fully covered.
You can modify the UV in Hexagon or export the OBJ and modify the UVs in UVMapper or other mapping program, then re-import into Hexagon and export as a sculpty map. Check for reversed normals, etc. before bringing into Second Life.
Examples:
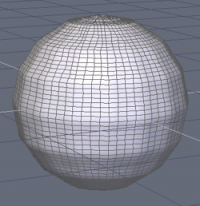
- Default Hexagon sphere, mapped spherically, exported as TGA, then re-imported into Hexagon:

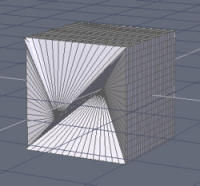
- Default Hexagon cube, mapped spherically on Y-axis, exported as TGA, then re-imported into Hexagon:
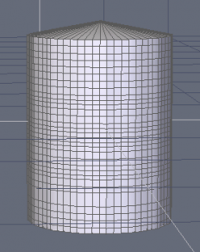
- Default Hexagon cylinder, mapped spherically, exported as TGA, then re-imported into Hexagon:

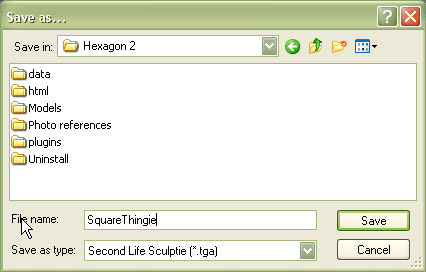
Exporting Sculpty Maps
To export the modified SL primitive:
- Choose File > Export > Second Life Sculptie from the menu.
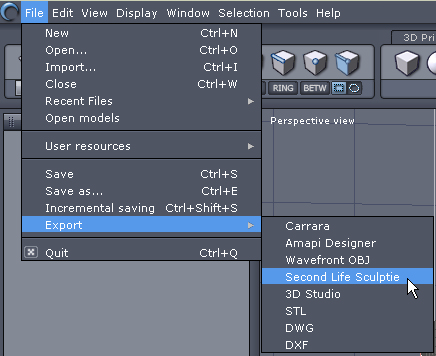
- A default save dialog will come up. Navigate to the folder where you want to save the file, enter a filename, and click on Save.
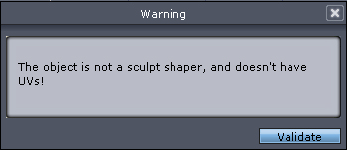
If you used a default Hexagon primitive and did not map it, you will get the following error message:
NOTE! The Mac version of the exported TGA file may look slightly different than the same one exported from a Win machine, however, it does not seem to affect how the sculpty looks in Second Life although it might slightly affect the rotation of any applied texture.
Texturing the Sculpty Primitive
The sculpty primitive can be textured in Hexagon or in a paint program by exporting in OBJ format then saving the UV Map out using UV Mapper or some other program.
You can also used Hexagon's painting tools, then save out the texture by exporting the object out in OBJ format. If you re-import the texture into Hexagon, make sure that the Flip Textures Vertically option is not checked. See the Hexagon documentation for more on using the Hexagon paint tools.
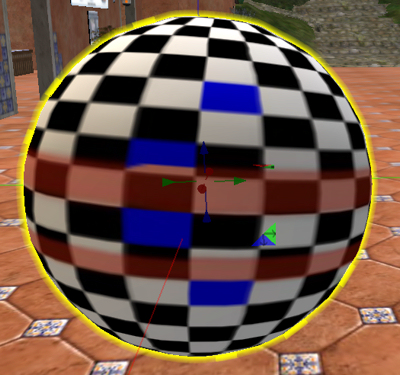
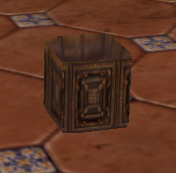
If you apply a texture to the SL sculpty in Hexagon, you will notice a section on the UV map seam (except for the cylinder) that looks similar to the image below:

But it looks fine in Second Life. Basically, this is the area at the top and bottom of the UV Map that is “blank” and not actually mapped to the object. The only issue is painting in Hexagon and trying to ignore this section at the same time. This appears to be because of the way sculpties are mapped in Second Life and how the Hexagon mapping has to be adjusted to work with the sculpty maps.
And here is the cylinder in Hexagon … no odd areas in sight.

Importing the Sculpty Map Into Second Life
To import the sculpty map you just created into Second Life:
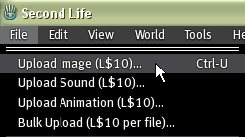
- In Second Life, choose File > Upload Image (L$10) from the menu.
- A default open dialog will come up. Locate the sculpty file, select it, and click on Open.
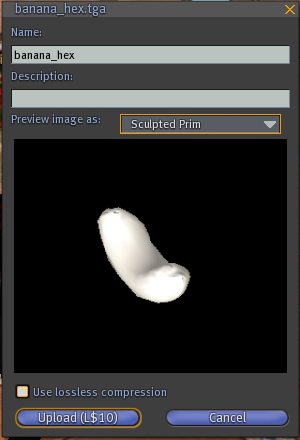
- To preview the map as a sculpted prim, click on the Image tab and choose Sculpted Prim from the menu.

- The object will be visible in the preview window (you may need to zoom in on it). Click on Upload (L$10) to upload the map (this will cost you L$10 to upload so make sure you have the funds available).
- The map will be uploaded and a preview window will come up as well. Click on Keep and the map will be placed into your Textures folder in the Inventory dialog.
Applying the Map to a Sculpted Prim
To apply the sculpty map to a sculpted prim in Second Life:
- Make sure you are in a location that allows you to build/create objects.
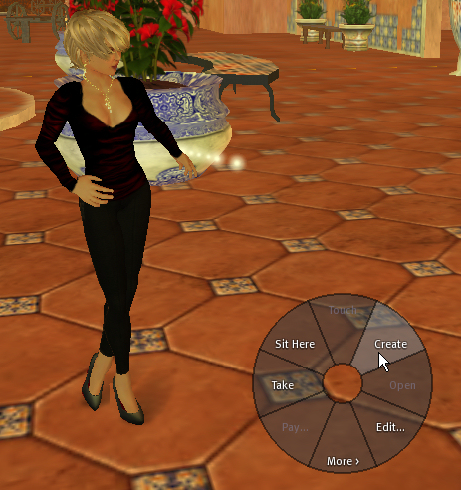
- Right-click on the ground and choose Create from the pie menu.
- The Create dialog will come up but don't worry about selecting a particular type of primitive. Just click on the ground to create the default cube.

- In the Create dialog, click on the More button if needed.
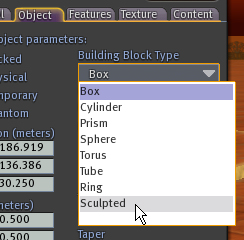
- Click on the Object tab and choose Sculpted from the Building Block Type menu.
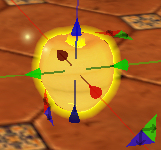
The default apple sculpty map will be loaded and the sculpty will now look like an apple.

- Click on the Sculpt Texture box to access the Pick:Sculpt Texture dialog, locate your map, and click on Select.
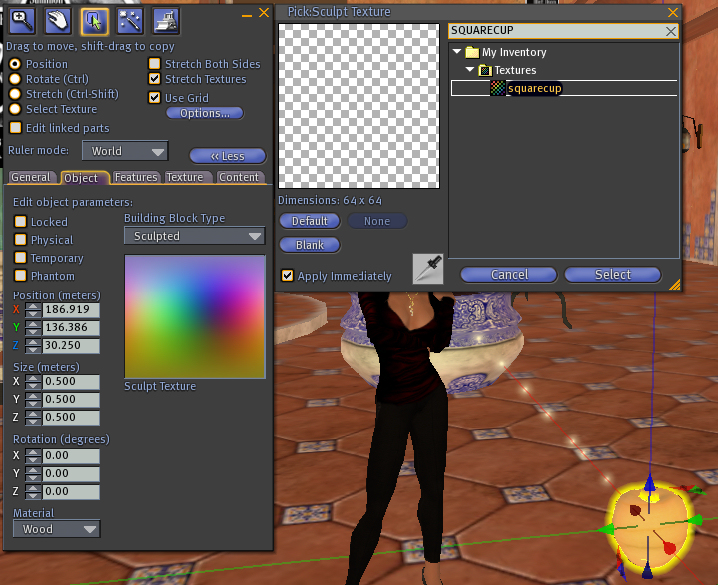
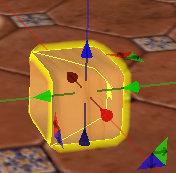
The sculpty map will be applied to the primitive. It may be on its side though.
- If the sculpty is inside out after applying the sculpty map, the tool you used may have flipped the UV Map (like the taper tool). Open the sculpty map in a paint program and flip the map horizontally, then re-import into Second Life.
- On the object tab or using the rotate widget, rotate the primitive until it is right side up.

- Now texture the sculpty and have fun.
Page Tools
Except where otherwise noted, content on this wiki is licensed under the following license: CC Attribution 3.0 Unported
