User Tools
Site Tools
Sidebar
How do I sort and filter my content?
Sorting

You can quickly sort your files by “A to Z” or by several other options. The “Sort Order” drop-down contains the following selections:
- Name: A to Z - Sorts the list by descending alphabetical order.
- Name: Z to A - Sorts the list by ascending alphabetical order.
- Product ID: Highest First - Highest ID, in descending order.
- Product ID: Highest First - Lowest ID, in ascending order.
- Download Size: Largest First - Largest Zip size, in descending order.
- Download Size: Smallest First - Smallest Zip size, in ascending order.
- Download Date: Recent First - Newest downloaded, in descending order.
- Download Date: Oldest First - Oldest downloaded, in ascending order.
- Order Date: Recent First - Newest purchases, in descending order.
- Order Date: Oldest First - Oldest purchases, in ascending order.
- Status: Busy First - Active Zips in Queue, in descending order.
- Status: Idle First - Idle Zips in Queue, in ascending order.
- Selection: Selected First - Selected Zips in Queue in descending order.
- Selection: Non-Selected First - Non-Selected Zips in Queue in ascending order.
Filtering
Filtering in Install Manager is very easy, but also has very advanced filtering modifiers available. We will cover the basic keyword filtering below. Please refer to the Reference Guide section on Advanced Filtering for more ways to view the products you want to see, and how you want to see them.
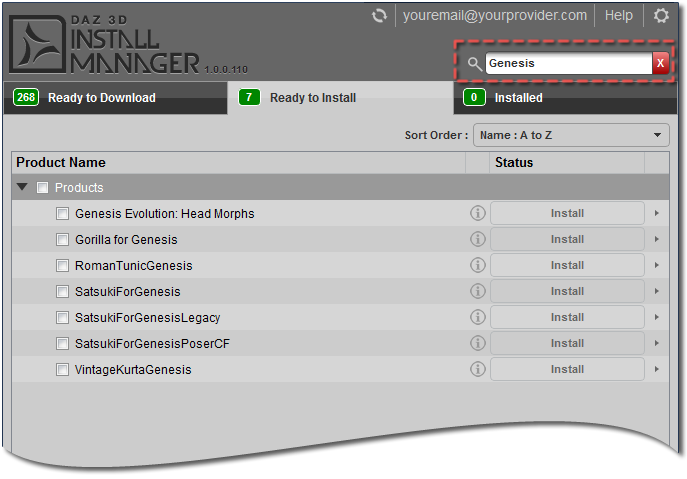
If you want to filter your file view to show only specific files, you can type your chosen keyword in the “Filter Field” as shown in the left-hand image below. We used 'Genesis'. Only products with the keyword 'Genesis' in the name, are showing. You can also use phrases. If you know all or part of a product name, type it in and the filter will show any products with that particular 'phrase'.
The nice thing about this feature is that is keeps your checked selections as you change filter words. Here, we are going to check the selection boxes for 'Genesis'.
In the right-hand image below, we left our “Genesis” filtered products checked, and then filtered by 'Victoria' and checked these products as well. When we return to our full list of products, you can see both filtered selections we made remain checked. The “Genesis” products remained checked, even when we ran a new filter and added the other product for “Victoria”.
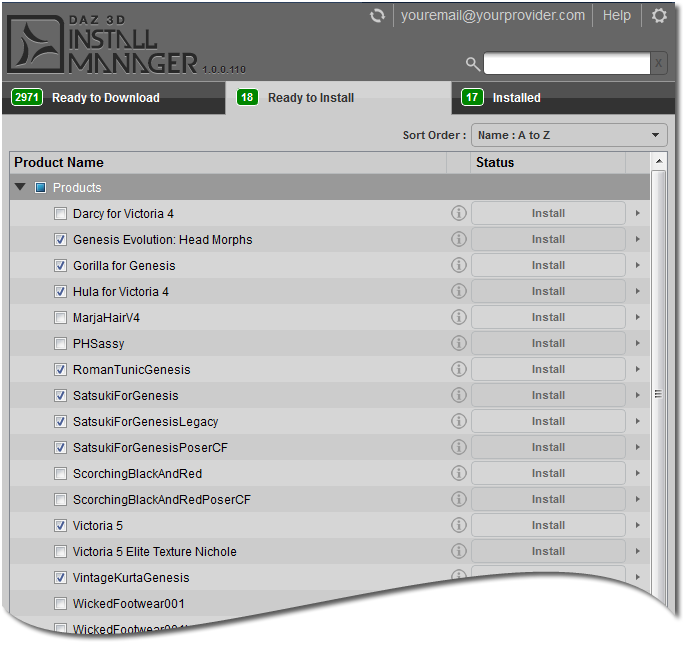
The filtering feature works across all the status windows. By this, we mean if we have 1 product with “Genesis” in its name already “Installed”, and 6 waiting in “Ready to Install”, we will see all 7 products. You can see this in our “Genesis” example here. We installed the Gorilla product from our previous filtering exercise. You can now see we only have 6 left in Ready To Install, and 1 is now listed in Installed.

You can do the same thing using the SKU number to find a particular product. Just put the number, for example, sku::12356 (or a range of numbers sku::12350-14350) in the Filter Field. Please see: Advanced Filtering for more advanced filtering options.
Page Tools
Except where otherwise noted, content on this wiki is licensed under the following license: CC Attribution 3.0 Unported
