Sidebar
Converting Material Presets to DUF
Summary
This article outlines how to convert material presets (MATs) to the .DUF format.
Most MATs affect every surface group, which makes them easy to save. There are situations, however, where partial MATs are necessary. A partial MAT will only include some of the surface groups instead of all. A good example of this would be the eye color MATs that are usually included with human texture sets for Genesis. Only the eye surface groups should be included in the MAT so that changing the eye color will not also swap out the skin textures.
Process Overview
- Review Surface Groups on Model
- Determine Which Surfaces the MAT Affects
- Save MATs to DUF Format
Foundation
DAZ Studio 4.5 must be installed and will be used throughout this tutorial.
This article is specifically about converting MATs from an older file type (.dsa/.dsb/.ds/.dsf) to the new .DUF format.
Definitions to Know:
- Partial MAT: Only affects some of the surface groups
- Full MAT: Affects all surface groups
Step By Step
Step 1 : Review Surface Groups on Model
MATs are usually built for specific models.
Load the model the MATs are built for into DAZ Studio and view the list of surface groups for the model in the Surfaces Tab. Knowing which surfaces are included on a model, and what they are named will help in the next step.
Step 2 : Determine Which Surfaces the MAT Affects
Almost all material files can be opened in a text editor. In some cases, a file may have been saved in binary. (dsb format) You can use the Script IDE in DAZ Studio to open these files. Open the MAT in a text editor and search for each surface group, one at a time. If any surface groups do not exist in the MAT, it is necessary to save the file as a Partial MAT. Otherwise, the MAT should be saved with every surface included.
Step 3 : Save MATs to DUF Format
Once it has been determined which surface groups belong in the MAT:
- Apply the MAT to the model
- Select the affected surfaces in the Surfaces Tab
- Browse to the folder in the Content Library that the preset will be saved to
- Click the + button in the lower left-hand corner of the Content Library and choose “Material(s) Preset…”
- Give the Material a name. Best Practice is to match the name of the file you are converting. This will save time later as well as allow you to track which file is which.
- Select Save
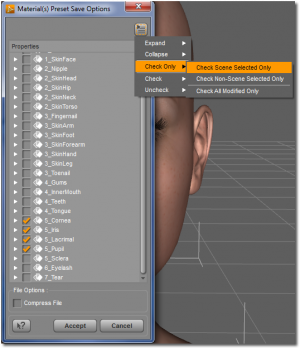
- In the resulting window:
- If a Partial MAT, click on the options drop-down → Check Scene Selected Only, verify the selections, and then click “Accept”
- If a Full MAT, simply click “Accept”
You should now be able to see your saved Material in the folder location you chose. It will have an icon that you will probably want to delete as it is just a screen capture. If you make sure the name of the icon .PNG and your material file match, your file will use the nicer icon.
Wrap Up
Other helpful links:

