Table of Contents
DAZ Studio 4.x
- QuickStart Guide PDF
- User Guide PDF
* = Review
Whether as a character tweaking body feature or a facial expression, Partial Body Morphs allow a subset of the vertices of a figure to be changed. Because these morph sets contain only “deltas” or changes from the base shape they work with, they can be distributed commercially.
While there are many ways to create a morph, this method will use the D-Former function within DAZ Studio.
(courtesy Richard Haseltine)
A morph is a set of “deltas”, the distance each vertex moves to get to the new shape (at a setting of 100%). If you dial multiple morphs then the deltas for each vertex are added together to get the final shift in position. For something like the ear morph most of the deltas are just 0, so they will not affect most parts of the mesh: if there's another morph in place that effects the ears then they will get the combined shift from both morphs. One morph cannot zero another, they aren't that smart - they just take the current position of the vertex and move it by a set amount, regardless of whether it's in its base position or already moved by another morph.
(For an alternate process, see Creating a Simple Morph * )
Begin by deciding if you want to build your morph from an existing Genesis shape, or from the default Genesis figure. In this case, we will build from the Basic Child shape. We begin by dialing that shape to 100%.
When exporting Genesis or any other subdivided figure, first set the Resolution Level to Base:

Then use the File→Export command to create an OBJ of the figure you will morph.
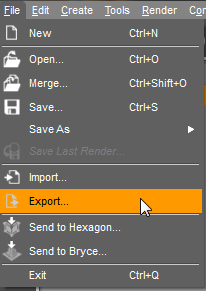
There are many combinations of export options available that may be appropriate, depending on your modeler. The critical point is to remember which options were used on export, so the same options can be used on import after creating the morph.

Most modeling software can handle the OBJ format. In this case, Blacksmith3DMorph was used.

After making your change, save out (or export) your modified OBJ. Usually the default parameters will be appropriate.
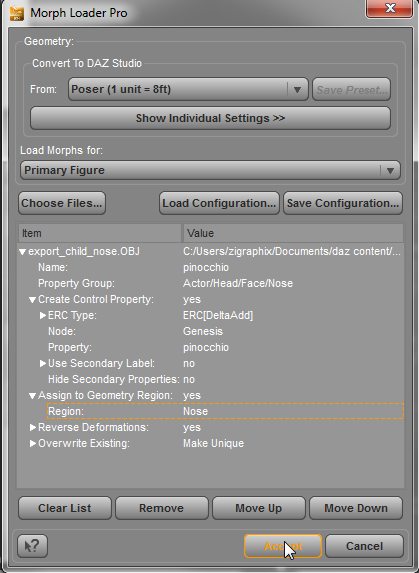
Return to DAZ Studio, and, with Genesis selected and the same shape dialed, launch Morph Loader Pro.
Again, remember to use the same settings to import your morphed shape as you used to export.
Morph Loader Pro offers several time-saving options on import.
Your new morph will appear in the section of the Parameters tab you selected on import, in the “Property Group” section.

Although the morph has automatically been created as type Morph/Shaping, it will not show in the Shaping Tab until it has been moved into the Actor hierarchy using the Property Editor.
Open the Property Editor tab:

Using the grouping tools in the left side of the Property Editor tab, put the controller for your morph in a logical place. In this case, we want the “Pinocchio” nose to appear in the Head/Face/Nose/Universal/Fantasy section.

After this change in the Property Editor, your morph will appear in the appropriate section of the Shaping tab.

See custom_parameters for more details.
If you want your morph to be automatically projected to clothing, right click the morph in the Property Editor and turn on AutoFollow.

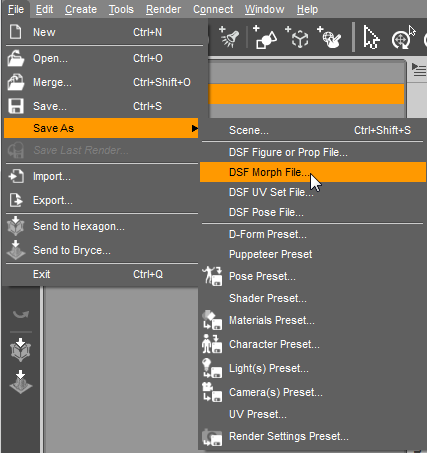
Select just that morph on save, or whatever you want in product. DON'T use Save As Figure DSF, you'll get a whole extra copy and double-morphs.
To redistribute your morph, you will need to save out to a morph DSF file.
Do not use the “Save As… DSF Figure” command when creating a morph. This would create a new copy of the figure shape, causing the current shape to double in strength whenever it is used.
Be sure to fill in your name as the artist, the Product Name, and confine your selection to the specific parameters you wish to include in the product.

Remember, you cannot include paramaters created by DAZ 3D or another vendor as part of your Product. Only select Parameters you have created.
After the save, you will be able to see your morph file in the data directory:

Test your morph by deleting the current instance of Genesis from the scene. Reload Genesis and check the Shaping tab for your morph. Remember, if you grouped the morph under one of the Regions, you will need to navigate to that Region of the figure to see your morph.

By reversing deformations from imported morphs, you create morphs that can be used with any Genesis shape, but you will still need to test combinations of morphs and shapes to see how compatible they are. DAZ Studio 4 does not filter morphs by shapes, but you should note intended and unsupported combinations of shapes and morphs in your product documentation.
