Table of Contents
DAZ Studio 4.x
- QuickStart Guide PDF
- User Guide PDF
This page is a WIP. There are likely to be incomplete and or missing steps while the page is being built.
This article is dependent on functionality that is not available until v4.5.x is released. Information relating to the current build status is available on the DAZ Studio v4.x page.
This article covers creating MCMs or Morph Corrective Morphs. It is a continuation of Advanced: Creating Joint Controlled Morphs (WIP), and assumes you have completed or are familiar with the information it contains.
This tutorial is for those who understand the basics and intermediate steps for character creation and 3rd party modeling tools. The items discussed require an advanced level of understanding DAZ Studio 4 Pro.
Using the Goblin as an example, we see that it will take a very precise morph to get the bottom and top eyelids to match and close nicely. Any change in the eye shape of a new character will probably require a corrective morph to get the eyes to close. Note how the goblin character's eyes do not close correctly with the default eyes closed morph that is included with Genesis. (See Illus. 1)
Since this is the most common Morph Corrective Morph, this will be used as an example in this tutorial.
The Eyes Closed Control on Genesis links to the two morphs - Eyes Closed Left, and Eyes Closed Right. It will be necessary to create two corrective morphs, one for each side.
The first step is to prepare the character for export. Make sure the Genesis figure is in the Zero Position. Apply the new character morph Goblin, as well as the Eyes Closed Right morph. This will be our starting point for modeling the corrective.
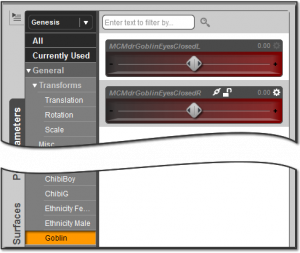
There are some settings that need to be taken care of before the model is exported. Start by making sure Genesis is selected, then switch to the Parameters Pane. Next, click on General and select Mesh Resolution. Set the Resolution Level to Base. (See Illus. 2).
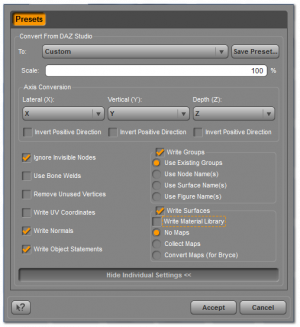
 Now it is ready to be exported out of DAZ Studio, and to be imported and modified in your modeling program.. Be sure to choose .obj as the type. It is also best to export out using DAZ Studio Scale. The export settings pictured here are sufficient for exporting out a morph. (See Illus. 3)
A note on naming the MCM. This MCM will be exported out and saved as MCMdrGoblinEyeClosedR. MCM = the type of morph it is, dr = artist initials (The creature creator has a head morph named Goblin, adding artist initials will lessen the chances of this characters files causing issues with another product) Goblin = character name, EyeClosedR = the morph it is correcting.
Open the morph in your modeler of choice and make the eye corrective. When the morph is completed, make sure that the new character morph Goblin is still applied, and the Eyes Closed Right morph is set to 1 Basically, what is in the scene should match what was exported out.
Load the new MCM onto the character using DAZ Studio's Morph Loader Pro. (See Illus. 4) In the options choose Reverse Deformations and change the default no to Yes. The other default options are fine. (See Illus. 5)
The new MCM by default loads under Morphs/Morph Loader. With the new character morph Goblin on, and the Eyes Closed Right morph still on, apply the new MCM control just created and see how it looks. (See Illus. 6) If it is satisfactory, the next step is to create the ERC Links to get it to work correctly. Set the new MCM just created back to 0.
The first thing to do is to think about what this new MCM needs to do.
Criteria for MCM:
Now that it is determined what the control must do, open up Property Editor. (See Illus. 8) Notice that Property Editor is divided into 2 sections. The Left contains Grouping/Settings, and the Right side contains the Hierarchy.
On the Left side, locate the new MCM that was created for the character. It should be found under the Morphs, Morph Loader Pro... section. If it is not there, click on tab options and use the Refresh Pane option to bring it up.
For completing criteria 1, look on the right side of Property Editor and locate the new character morph Goblin, this is where the first link is made. By clicking on the triangular shaped tab before Goblin, you can open up more properties associated with it. Drag the new MCM morph from the left side and look under the Goblin, drop it directly onto Sub-Components. (See Illus. 8) When it appears under subcomponents, select it. Down at the bottom of the Hierarchy side there is a box called Link Attributes Change the ERC Type to Multiply. (See Illus. 9)
Criteria 2, must work with the Eyes Closed Right Control. This control will be found under its internal name of PHMEyesClosedR. Locate the PHMEyesClosedR properties on the right side under Hierarchy, and open up the tree underneath it. Locate the new MCM from the Left side of the pane, and drag it onto Sub-Components found under PHMEyesClosedR. It will then appear under Sub-Components. (See Illus. 10)
Note that under Link Attributes the default ERC Type is Delta Add this is what is needed for this link. Do not change it. The Scale value should be left at its default value of 1. (See Illus. 11)
Close Property Editor and test the morph. Zero the figure. Apply the new character morph Goblin, and the Eyes Closed Right morph. The new MCM should apply to its full strength.
Leave the Eyes Closed Right morph on, and remove the new character Goblin morph. The new MCM should go back down to 0.
The same steps are repeated for the Left Eye corrective morph.
In this final step we will do some clean up and finalize the location of the MCM. All of this can be done back in the Parameter Settings. Refer to Step 3 if you need help getting back to Parameter Settings.
MCMs are meant to only correct morph issues. They should never need to be set by the end user. For that reason, it is best to hide the control and place its location in a Hidden category, to make it clear to the end user that it is a morph that should only work in the background.
In Parameter Settings, check the Hidden box. (See Illus. 12)
It has been an internal DAZ 3D standard to use display as Value. With the Parameter Settings still open, make sure As Percent is un-checked. (See Illus. 12)
Next, if you desire, the color of the control display can be changed. Changing the color in this case, is an indication to the user that this control should not be used. Change the gradient top/left to a red color. Internally DAZ 3D uses 127,0,0 for the Gradient Top Left, and 41,41,41 for the Gradient Bottom Right. (See Illus. 13)
While here, set the content Type. Click on the arrow, next to the Type text box, and choose Modifier/Corrective from the Menu.
The last item on the list is to move the control from Morphs/MorphLoader to a different location. Once again, click on the arrow, this time next to the Path text box. A large list opens up listing all the current groupings available in Genesis. In this case, the exact one we want is not yet created, but choose the closest, Hidden/MCMs. In the text box, add /Goblin. (See Illus. 14)
You can also type it in manually, but by choosing the closest path first, you are more likely to avoid typing errors.
 You are now done editing your MCM. Choose Accept to close the Parameter Settings.
The new MCM is now hidden and has been moved to its new location. In Parameters (as well as Property Editor) it can be found under Hidden > MCMs > Goblin. The color scheme matches the DAZ 3D production standard for Hidden Controls. (See Illus. 15)
This finalizes the MCM creation.
At this point, any work you have done will be lost if you close DAZ Studio or start a new scene. You must save your MCM. If you need to learn how to save morphs, please refer to the Saving Morphs (WIP) 2014 article. Here you will learn the different saving options available and select the one that best fits your workflow.
This completes the second article in our series. When you are ready, continue on to the rest of the Advanced Character Creation series, linked below.
Previous Articles:
Continuing On: